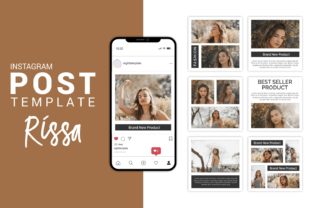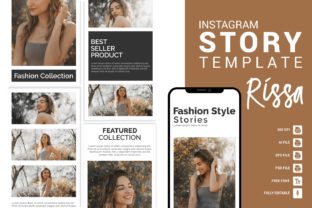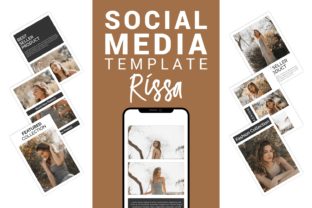
Rissa – Fashion Social Media Template for Streamlined Brand Content
Consistent visual branding across social platforms is a challenge that every fashion-focused creator, marketer, or small business owner faces. Between story posts, grid content, and Pinterest pins, maintaining a cohesive look often eats into time better spent on product development or client work. The Rissa – Fashion Social Media Template is designed to solve exactly that problem. Built for both Adobe Photoshop and Adobe Illustrator, this template set provides a structured foundation for producing brand-aligned visuals quickly, without sacrificing creativity or quality.
This article walks through what the template includes, how it fits into a real content production workflow, and practical ways to integrate it into your existing process—whether you are planning a launch, refreshing your brand presence, or scaling up your social media output.
What the Rissa Template Delivers
Before diving into workflow integration, it helps to understand exactly what you are working with. The Rissa template is not a single file but a collection of pre-sized design files aimed at three key content formats: Instagram Stories, Instagram Posts, and Pinterest Pins. Each format is provided in the correct dimensions, so you do not need to resize or guess aspect ratios.
- 8 Instagram Story Designs at 1920 px by 1080 px
- 12 Instagram Post Designs at 1080 px by 1080 px
- 8 Pinterest Designs at 1500 px by 1000 px
All files come in three formats: native Adobe Photoshop (.psd), native Adobe Illustrator (.ai), and an EPS file for broader compatibility. Every element—colors, text, fonts, shapes, and backgrounds—is fully editable. The layered structure is well organized, and smart objects are used in the Photoshop files to simplify image swaps without breaking the design.
Where This Template Fits in a Content Workflow
The real value of a template like Rissa becomes apparent when you look at the typical content production cycle. Most fashion brands or influencers move through stages: planning, asset creation, review, scheduling, and posting. The template primarily serves the asset creation stage, but its design directly influences the planning and review stages as well.
Before Creation: Planning with the Template in Mind
When you know the template offers 28 distinct layouts across three formats, you can plan your content calendar around these existing structures. Instead of designing each post from scratch, you map your copy, product shots, and color palette to the available layouts. This pre-planning saves decision fatigue later. For example, if you are launching a seasonal collection, you can assign specific story layouts for behind-the-scenes content, post layouts for product reveals, and Pinterest layouts for style inspiration boards—all within the same visual system.
During Creation: Efficient Execution
This is where the template demonstrates its practical value. Because the files are layered and vector-based, you can edit text, swap images via smart objects, and adjust colors across all designs in a single session. A typical workflow might look like this:
- Open the Photoshop or Illustrator file for the format you need.
- Double-click the smart object layer to insert your product or model photo.
- Update the placeholder text with your caption or call-to-action.
- Adjust the color palette using the global swatches to match your brand guidelines.
- Export the final file at 300 DPI for print-quality or digital use.
The entire process for a single post can take under ten minutes once you are familiar with the file structure. For a batch of twelve posts, you might spend a focused hour or two, depending on how much custom copy and imagery you need to prepare.
After Creation: Review and Consistency Checks
After exporting, the template also aids the review process. Because the designs share a common layout system, you can quickly scan the batch for visual consistency. Are the fonts uniform? Do the background colors align with your brand palette? Are the image treatments cohesive? The template enforces a baseline consistency, so your review time is spent on content accuracy rather than fixing design mismatches.
How Rissa Interacts with Other Tools and Assets
No template works in isolation. The Rissa files are designed to integrate smoothly with several common tools and resources you likely already use.
Adobe Creative Cloud Ecosystem
Because the template is built for Photoshop and Illustrator, it fits naturally into any workflow that relies on Adobe software. You can bring in assets from Adobe Lightroom (edited product shots), Adobe InDesign (for any print collateral that shares brand elements), or Adobe Fonts (to ensure your chosen typeface is available system-wide). The layered structure also makes it straightforward to bring in elements from other PSD or AI files you have built previously.
Stock Photography and Brand Assets
The template includes placeholder photos for display purposes only, but you are expected to replace these with your own images. This means your workflow should include a step where you prepare your photo assets in advance. Whether you shoot with a DSLR, use a smartphone, or license stock images, having your visuals ready before you open the template keeps the process smooth. The smart object layers accept most common image formats, and the 300 DPI resolution ensures your final exports are crisp.
Social Scheduling Platforms
Once you export your designs as JPEG or PNG files, they are ready for upload to scheduling tools like Later, Buffer, Hootsuite, or Meta Business Suite. The predefined dimensions (1080x1080 for posts, 1920x1080 for stories, 1500x1000 for Pinterest) match the recommended specs for each platform, so you avoid cropping or aspect ratio issues during scheduling.
Practical Implementation Tips
Getting the most out of the Rissa template requires a small amount of upfront preparation. The following observations come from using similar layered templates in production environments.
Set Up a Master Color Palette First
Before you begin editing individual files, open one of the Illustrator or Photoshop documents and define your brand colors in the global swatches panel. In Illustrator, this means creating a color group that you can reference across all artboards. In Photoshop, you can use the color picker and save swatches for reuse. Doing this once ensures that every layout you edit uses the same palette, which is critical for maintaining brand consistency across Instagram and Pinterest.
Prepare Your Fonts and Text Blocks
The template uses free fonts, and the link to those fonts is provided inside the download. Download and install them before you start editing. If you prefer a different typeface, you can substitute it easily since all text layers are fully editable. However, if you do change fonts, make sure the new choice maintains readability at the smaller sizes used in stories and pins. Test your copy length against the layout to avoid text overflow, especially on story designs where screen real estate is limited.
Batch Edit for Efficiency
Because the files are well organized, you can work in batches. For instance, open all 12 Instagram post designs in one Photoshop session. Use the same smart object image for the first few posts if you are building a series, then swap images individually as needed. This approach reduces context switching and helps you maintain a steady creative flow. The same logic applies to the story and Pinterest files.
Use Layers to Your Advantage
All files are organized with layered shapes, text, and images. If you want to create a custom variation that is not part of the original set, you can duplicate a layout and rearrange the layers. For example, you might take a post design and repurpose it as a story by hiding the post-specific frame and adjusting the canvas size. The vector-based shapes scale cleanly, so you are not limited to the original compositions.
Quality Control and Long-Term Use
A template this comprehensive should hold up over repeated use, but a few habits will extend its lifespan in your workflow.
Maintain a Master File
Instead of editing the original downloaded files each time, keep a master copy untouched. Duplicate it for each campaign or month. This way, you always have a clean baseline to return to if you need to reset your brand colors or start a new project. Over a year of consistent use, this practice alone prevents file corruption and keeps your workflow organized.
Archive Exports with Campaign Labels
After you finish a batch of posts, export them into a folder named by campaign or date. This makes it easy to find past content for resharing on Pinterest or for performance analysis. The template gives you a consistent visual foundation, so archived posts remain cohesive even when viewed months later.
Adapt for Seasonal or Promotional Needs
The clean, creative layout of Rissa is neutral enough to support seasonal branding. You can change background colors to reflect a holiday palette, adjust text for a limited-time sale, or swap in themed photography without altering the underlying structure. This adaptability makes the template useful beyond a single launch. It can become the backbone of your ongoing social media presence.
Observations on Workflow Integration
From a practical standpoint, the strongest advantage of using Rissa is the reduction of repetitive decisions. Every time you sit down to create a post, you do not need to decide on layout, frame placement, or typography hierarchy. Those decisions are already made within the template. Your focus shifts to content: selecting the right image, writing a compelling caption, and ensuring your message aligns with your broader marketing goals.
This shift is especially valuable for solo entrepreneurs, freelancers, or small teams where one person handles both design and copy. The template acts as a silent partner that handles the structural work, freeing you to concentrate on the elements that directly impact audience engagement.
For educators or bloggers who publish tutorial-style content alongside fashion visuals, the template also offers a way to maintain a polished look without needing advanced design skills. The vector-based shapes and smart object workflow mean you can produce results that look professionally designed, even if your background is in writing or marketing rather than graphic design.
Final Thoughts on Using Rissa in Your Routine
The Rissa – Fashion Social Media Template is a practical tool for anyone who needs to produce regular, brand-consistent visuals across Instagram and Pinterest. Its layered, editable structure in Photoshop and Illustrator makes it compatible with standard design workflows, and the inclusion of multiple formats means you can cover stories, posts, and pins from a single source. By preparing your assets in advance, setting up global colors, and batching your edits, you can integrate this template into your routine with minimal friction. The result is a more efficient content production process that leaves you with more time to focus on your audience, your products, and your creative direction.